Settings and 3D models
Contents
Coordinate format
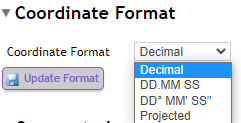
Coordinates are stored within TVV as WGS coordinates. There are four options on how to display coordinates in the TVV portal. These are:
- WGS – Decimal
- WGS – DD.MM SS
- WGS – DD° MM’ SS”
- Projected – Decimal
The coordinate format can be changed by choosing the relevant coordinate and clicking Update format
Projected coordinates will be converted to and from WGS using the Projection setting of the appropriate project. E.g. turbine coordinates are converted using the Projection setting of the project they are associated with.
Organisation logo
An organisation logo can be uploaded to the portal and will be used when generating PDF files for export.

To upload a logo, choose the image file and click Upload Image.
Logo’s should be a resolution of 350px x 150px
Cumulative project types
Cumulative project types are only shown if you have access to the wind domain.
These are ways of grouping cumulative projects together into categories. By default, all organisations get a standard set of cumulative project types:
- Under Construction
- Consented
- Proposed
- Scoping
- Operational
- Optimisation
- Under Construction / Consented
A new type can be added by clicking New Type. The order of the cumulative project types can be altered using the arrow buttons.

3D Models
3D models can be uploaded to the portal for use in TVV. These 3D models must be in XNB format. From a 3D model, a turbine, solar, tower or building type is created.
Please contact hello@trueviewvisuals.com to discuss converting your 3D model into the appropriate format.
To create a new 3D model, scroll to the Objects section and click New 3D Model.
Choose the model file to upload, select the appropriate project type: Wind, Solar, Grid or Building, and click Add Model
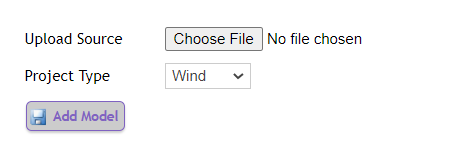
Depending on the size of the model, it may take up to 10 minutes to upload. Refresh the page to check if the model has been created.

Once the model specification has been updated successfully, the portal will direct you to the ‘Model edit page’ where model and textures can be added.
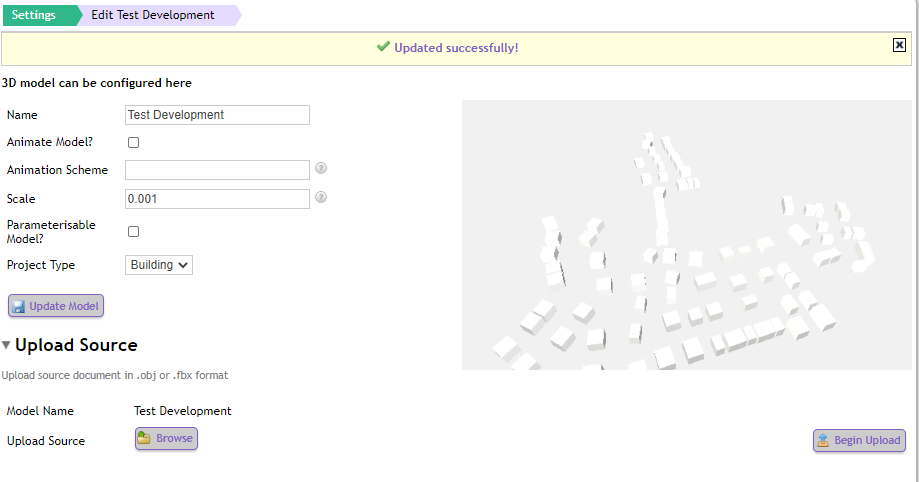
Here you can use the Upload Source form which allows you to upload an XNB file, and the Upload Texture form, which allows you to upload .png files.
Simply browse to the model on your computer, and after selecting it click Begin Upload.
Each model specification can possess one model and an optional texture.
Once both the model and (optional) texture are made available you will be able to begin placing your custom 3D content in TVV for visualisation.
Turbine types
The turbine type allows the 3D model to be parameterized with hub height and turbine blade length. If you don’t choose a 3D model when setting up your turbine types, TVV will default to using the generic 3 blade turbine 3D model.
To create a new turbine, click New Turbine Type
Enter the required details and click Add Turbine
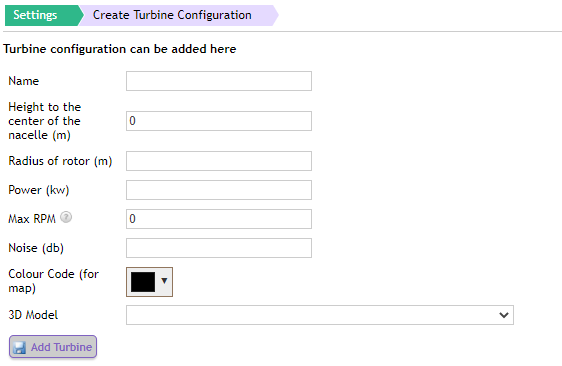
| Field | xxx | Description |
| Name | Complete a name or number to allow the Turbine to be identified. | |
| Height to the centre of the nacelle (m) | This describes the height from the ground to the centre of the nacelle in metres. This is used to render the turbine model more accurately and affects the way the 3D model is displayed in the visualisations. | |
| Radius of rotor (m) | This describes the length of a single blade or the radius of the rotor sweep in metres. This is used to render the turbine model more accurately and affects the way the 3D model is displayed in the visualisations. | |
| Power (kw) | Optional field. This field describes the power generation, or the carriage capacity, of one single installed item. This field is for information only, if it is left blank, power information will not be shown in the app. | |
| MaxRPM | The maximum RPM that this turbine should be animated at. This is automatically calculated from the radius of the rotor. | |
| Noise (db) | Optional field. This describes the noise produced by the turbine in decibels. This field is for information only, if it is left blank, noise information will not be shown in the app. | |
| Colour Code | Optional field. The colour of the turbine specification to be displayed on the maps in the app. | |
| 3D Model | Optional field. The 3D Model to use for this type of item installation. If left blank, the built-in generic 3D model will be used instead. |
Solar Panel types
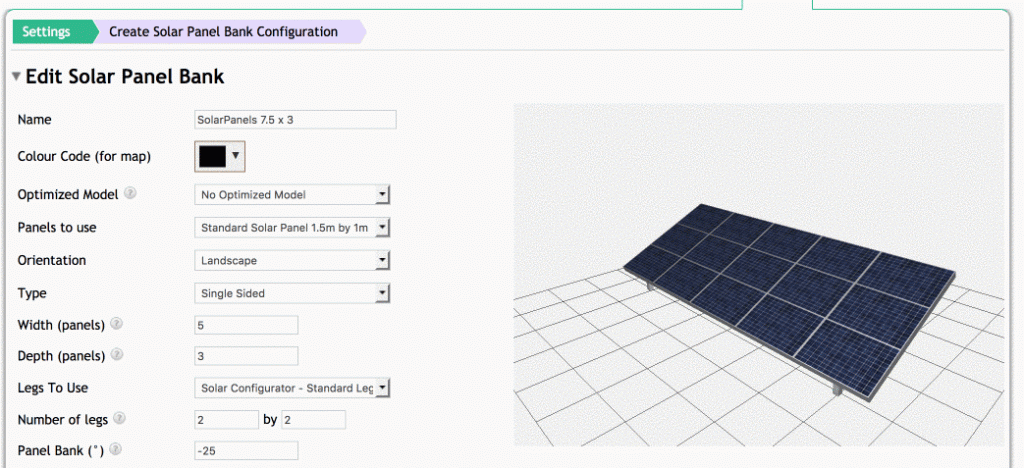
The TrueViewVisuals portal enables you to see what a solar panel will look like as it is designed.
To create a new solar panel bank, click New Solar Panel Type
Enter the required details and click Add Solar Bank Configuration
The solar panel bank configuration page provides a preview on the right of the screen to show what the panel bank will look like. This defines a single solar panel bank.
| Field | xxx | Description |
| Name | Complete a name or number to allow the Solar Panel to be identified. | |
| Colour Code | Optional field. The colour of the solar panel specification to be displayed on the maps in the app. | |
| Optimised model | Choose a pre-configured model or no optimised model. If set, the app will display the optimised model instead of building it from the configuration. This is faster but less flexible | |
| Panels to use | Choose one of the types of panels that are available from the dropdown menu | |
| Orientation | Choose portrait or landscape | |
| Type | Currently only single-sided, this will be extended in the future | |
| Width | The width of the bank (count of individual panels) | |
| Depth | The depth of the bank (count of individual panels) | |
| Legs to use | Choose one of the leg models that are available from the dropdown menu | |
| Number of legs | Number of legs wide by deep | |
| Panel Bank | The angle of the solar panel bank. 0 is facing upwards, -90 is facing forwards |
Tower types
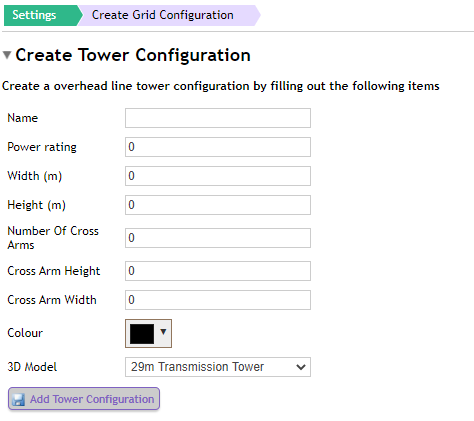
The TrueViewVisuals portal enables you to see what a tower (pylon, wood pole or other electrical infrastructure) will look like as it is designed.
To create a new tower, click New Tower Type
Enter the required details and click Add Tower Configuration
| Field | xxx | Description |
| Name | Complete a name or number to allow the Tower to be identified. | |
| Power rating | Optional field. This field describes the power generation, or the carriage capacity, of one single installed item. This field is for information only, if it is left blank, power information will not be shown in the app. | |
| Width | The width of a transmission tower base. | |
| Height | The height of the transmission tower | |
| Number of cross arms | The number of cross-arms this type of transmission tower possesses | |
| Cross arms height | The height at which the cross-arms are placed. | |
| Cross arms width | The width of the cross-arms on this type of transmission tower | |
| Colour | Optional field. The colour of the tower specification to be displayed on the maps in the app. | |
| 3D Model | Optional field. The 3D Model to use for this type of item installation. If left blank, the built-in generic 3D model will be used instead. |
Building types
The TrueViewVisuals portal enables you to see what a building will look like as it is designed.
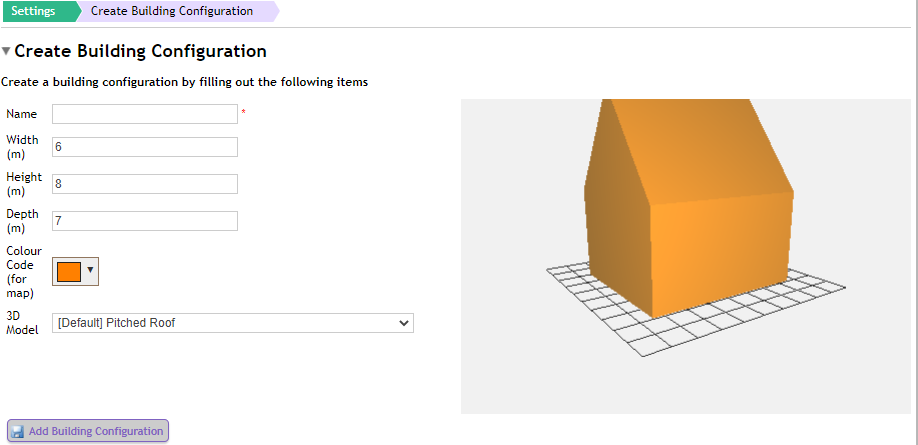
We have two types of building models: cuboid and pitched roof models. It is also possible to upload a bespoke model of a building for display in the project.
To create a new building click New Building Type
Enter the required details and click Add Building Configuration
| Field | xxx | Description |
| Name | Complete a name or number to allow the Building to be identified. | |
| Width | The width of the building | |
| Height | The height of the building | |
| Depth | The depth of the building | |
| Colour | Optional field. The colour of the building specification to be displayed on the maps in the app. | |
| 3D Model | The 3D model to use for this type of item installation. From here you can choose the default models of cuboid or pitched roof, or a previously uploaded model. |